Pages

Wednesday, December 12, 2012

Non-Dairy Kefir Experiments, Part 1 of N


This is dairy kefir grains with apricots

So, back in June, I visited a raw dairy farm in Pennsylvania and picked up some dairy kefir grains. I wrote about kefir back then as experiments into a super food. Since then we grew and doubled are number of kefir grains, split them and gave half to a friend.

Dairy kefir, though, takes regular care and feeding to maintain, and you are constantly producing more kefir. Since we also make our own yogurt, I found myself just keeping the kefir alive by replacing it's milk once a week, rather than drinking most of the kefir product.  The plan was to dry the kefir grains, and they can be stored dry for up to a few years.

But, then I decided to investigate whether we could use our dairy kefir grains to ferment other things. I'd heard that you could ferment coconut water, for example, and make a non-dairy kefir. Could I use the grains I have to do that?

The answer is: kinda. You can usually convert the dairy grains to instead take their food from another source of carbohydrates, but there is a high chance they'll die off and they will inevitably stop growing in other mediums. It's recommended, then, that you only use spare grains for this kind of experimentation.

Once you convert your grains to feed off of sugar, though, you can then make kefir soda pop - a fizzy, fruit-drink high in probiotics.  Many people reported success of keeping their converted grains producing soda for over a year, though they had no growth in grains.

Non-dairy kefir is generally called water kefir, and it is normally produced by an altogether different symbiotic community of bacteria and yeast (SCOBY) than the dairy kefir SCOBY that originates in the Caucus mountains. As best as I can tell, there are at least two distinct SCOBYs that produce water kefir, called by different names, but most commonly sweet water kefir (SKG) and ginger beer plant. The SKG are also called Tomi grains and seem to originate in Mexico.

To grow a SCOBY with a sugar-water solution, you need to use a real water kefir SCOBY. I have ordered some of that, so we can see what it is like.. but in the meantime, I went about and converted some dairy grains.

I won't try to pass on the science, as I don't fully understand it and it's documented on the internet. This site is the most authoritative, but also overwhelming, site on kefir on the Internet, by all accounts: Dom's Kefir Website. Another website that has a very detailed FAQ and seems more accessible is Yemoos Nourishing Cultures.  Searches on "water kefir", "converting dairy kefir to water kefir", "kefir soda pop", etc. will all yield lots of results.

 Instead, here's the nutshell of what I've learnt, specifically about creating water kefir from dairy grains.

  • It generally takes several days to convert the grains to eat non-dairy sugars, many sites citing up to 5 days. Mine started fermenting in about 48 hours. 
  • Once converted, it is difficult to convert them back to dairy products. They may die off, and they most certainly won't continue to grow. 
  • The base solution for water kefir contains: non-chlorinated water (spring or hard well water is recommended), some dry fruit, some sugar (about 10-15% solution). Some recommend adding egg shells, baking soda, and if using refined sugar, a bit of molasses. 
  • You need to use the most pure water you can, spring or well water. If you only have city water, you can let the chlorine evaporate by setting the water out overnight. At a minimum, you need to get rid of the cholorine or it will kill off your SCOBY.  Since we aren't on city water, we haven't researched this fully. And hard water is recommended, which is why they add egg shells to the mix. 
  • Varying the types of fruits and sugar you use will vary the taste of your water kefir. 
  • After it has fermented, you strain out the grains and other ingredients and restart the grains in new sugar water. Put the water kefir in the fridge, or... 
  • many people then take the fermented base and add in in a 50/50 solution with some sort of fruit juice for a second ferment. The second fermentation will feed the bacteria and yeast that are in the water kefir solution with a whole new set of sugars. This is generally what is called soda pop kefir.
  • Some people just use one fermentation and start their based with fruit juice, however, this can discolour the grains. SKG also doesn't seem to like to feed on fruit juice, and so the single fermentation is usually done only when using converted grains. 
  • You can feed your converted grains any kind of carbohydrates - various dried fruits, different sugars, to include honey, coconut water, and others. You can't use Stevia, as it doesn't have carbohydrates to feed on.  Most sites recommend unprocessed sugars like Turbinado, Rapadura, etc. 
  • Converted grains produce a slightly more alcoholic drink than water kefir from SKG. Sites seem to provide numbers of 1-2% for converted grains and 0.5-1% for SKG. However, the alcohol content is highly dependent on the type of sugars and the length of fermentation. 
  • You can ferment water kefir either air tight, loosely covered, or opened, and this also effects the end product. 
  • Once the solution is put in the fridge, the fermentation slows way down and you can control the level of fizz that way. The Art of Fermentation recommends using some solution in type 2 (so it doesn't leach chemicals) old soda bottles so that you can feel the level of fermentation with your hands. Everything else says don't fill about the 3/4 mark in the tight jar, but I think this also assumes that you still monitor things and put in the fridge at exactly the right moment. 
  • As far as timing goes, both for taste and for CO2 issues, they say to ferment the grains for 24-28 hours, then do the second ferment at room temperature for 12-48 hours. After this time, you need to put them in the fridge because of the CO2 build up. Also, the ambient temperature of the room really matters, so in Summer you need to exercise more caution.  
Comparing the kefir alone fermenting with a mix of juice and kefir

Here's our first experiments:

  • I took our dairy grains and washed them several times. Then added them to water straight from our well, to get the most minerals possible, with sugar-in-the-raw, a little molasses, dried apricots, and an egg shell.  I put this in a mason jar, filling only 3/4 full, and tightly sealed the jar. 
  • It took about 48 hours to get distinct bubbles rising, and after 72 hours we divided the solution. We put some in the fridge. It was only mildly fizzy, but had a wonderful taste. We took some solution and left it to sit by itself, and we created a third solution of 50/50 with apple juice. 
  • The base solution has continued to ferment but slowly. 
  • The 50/50 solution is fermenting rapidly and has a strong show of bubbles after 24 hours. Tasting it after 24 hours, it still has strong apple juice flavour, but it is definitely not as sweet. 
  • We have started a second base solution using sucanat (a dark unprocessed sugar), fig, and cranberries. This solution is really quite dark and when we started fermenting it, it was sickeningly sweet tasting.  It began fermenting gently after about 24 hours. 
  • My biggest concern right now is controlling the CO2. I don't have a strong understanding of that process or controls, and there a good risks associated with explosion of glass and sugar in the kitchen! And if you keep releasing the CO2, as I've done on some of these, then eventually your fermenting dies down and you loses the bubbles. One good, but kind of expensive, option seems to be flip-top soda/beer bottles for the second ferment and storage. Still, there doesn't seem to be really good information about how to calculate the liquid levels to avoid problems, and I now suspect that's because it's pretty complicated. 
  • The consensus I found in the fermentation Real Food world was to fill the jar 3/4 full for the first ferment with the grains, then when you put them in a soda jar, to leave 1" of headspace.  Their consensus seemed to be that less headspace was more dangerous, but I had home brewers tell me otherwise. Another thing they recommended it to put the fermenting bottles in a place that if they do explode, it's contained. :)
  • In my first batches, I kept burping them because I was worried about the CO2. They did have a nice flavour to them, fermented, sweet but not too sweet. But, with all my opening and closing, they definitely went flat. The other thing was that I took one jar that had the mason lid bulging and put it in the fridge, but 12 hours later it was flat. I am assuming that the jar wasn't quite airtight - not sure. 
Our second batch used sucanat - an unprocessed sugar - that left the grains dark brown!
     
I am tracking our experiments and their outcomes in a dynamic Google doc spreadsheet that can be found here.  This says what sugars, fruits, timing, etc. we used, as well as tasting outcomes.
Our Sugary Kefir Grains (SKG) have just arrived. They were $6.50 on Ebay.  They are totally bizarre looking. nothing like dairy kefir! so, we'll see how that goes....


Thursday, October 11, 2012

When Life Gives you Green Tomatoes....


Ripen them. 

Last year, a friend of mine gave me all her remaining green tomatoes as the warm Summer nights came to a close and the promise of vine-ripened heirloom tomatoes disappeared. Green tomatoes have the tartness of tomatillos, not to mention the colour, so I turned them into a verde sauce. Cutting them into huge chunks and stewing them with onions, garlic, and hot peppers. Then froze it. This makes for a wonderful cheese (or kale/greens) enchiladas verde later in the winter.

But this year, I decided to experiment with ripening. I took each of her tomatoes, wrapped it in newsprint and put them all in a cardboard box. In addition to her array of huge heirlooms, I had many green paste tomatoes of my own from my ever failing veggie garden. Those i just tossed in a brown paper bag and rolled closed. Over the next two weeks, her tomatoes all softened and turned a lovely shade of red. In turn, I tossed them into the freezer just as they were.

turning unwanted unripened fruit into red gold
This past few days, I grabbed all of the tomatoes from the freezer and tossed them into a pot with some oregano and basil from the garden. Let that stew for many hours so it would thicken (to about half of the original water content). Then run the whole thing through the foodmill real quick to weed out the seeds. Tada. Marina sauce that started with her unwanted green tomatoes. That got popped into jars and canned in the pressure canner. Now we have two quarts of sauce for the winter. Alas, only two quarts. It really takes a lot of tomatoes to make tomato sauce. :(

With a bit of sauce left over, I made my first bloody mary. quite excellent.  The tomatoes had gone from tart to purely tomato. Really pretty amazing.

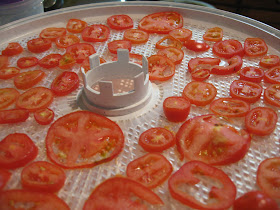
Simply slice the paste tomatoes and add to the rack
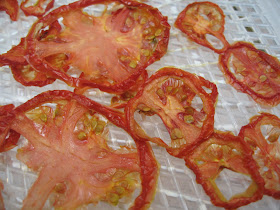
With my remaining paste (plum shaped) tomatoes, I sliced them and threw them in the dryer. Six hours later, I have some very potent dried tomatoes.

several hours later... "sundried" tomatoes.
So, don't toss your green tomatoes or let them rot on the vine. You can just toss them in the freezer (green or ripened) and sort it out later.

Now as we move out of the easy gardening season, I am once again looking forward to the winter CSA with Everblossom Farms in Pa.


Wednesday, August 1, 2012

Cautious Optimism in the Garden

The acorn squash starts white (rear)
Last year I told the story of my endless struggle to grow vegetables in the midst of the woods. Others might think the wiser of it, but every year I give it a go. Last Spring, I bought and then shoveled nine yards (=a lot) of compost to create a raised bed which I enclosed in a 6' high, 10'x10' dog kennel to keep out deer. But, the compost was really not composted completely and was horrible. It killed all my plants.

This year, the raised compost bed is better. It hasn't outright killed anything. The tomatoes were quite leggy though and don't have much fruit, and they don't look great. I did get a decent set of beans from it, chard continues to grow in it, and there is a single tiny watermelon in development.

But the exciting news for me is in the newest bed. Having failed with the compost, I hauled the sandbox I'd made for my son when he was a toddler across the property and adjacent to the dog kennel. I filled it with commercial soil, compost, humus. I planted garlic in November and left it over winter. In the Spring, I put in some beans, peas, and various odd seeds.  So, my garlic did great. At least by my standards, and I wrote about that in June.

Now the exciting news is winter squash. Two winter squash plants -- an acorn squash and a buternut squash -- are taking over the property, running 10' each in any direction. I've never had success with any squash before and I've always been told winter squash is the hardest. But, low and behold, I have squash growing ! There are three butternuts on the vines, and acorns continue to pile up.. there must be ten or more of them now. I'd love to get more butternut, but they seem to have done their thing.

Now, we wait. I can't harvest them for another 8 weeks or so. There is soooo much that can go wrong before then. Deer can come through and eat the entire thing overnight -- that has happened to me before. Bugs are another huge challenge, though I didn't see any squash bug eggs on the leaves. And then there is just rot and other enemies of success.

Keep your fingers crossed !
The immature butternut starts out with green and white stripes - this is about 6" long
Here the white has turned yellow over about a week... it should then, I think, go dark green


Tuesday, July 10, 2012

Science Adventures in a Super Food


After 26 hours of fermenting at 78degF - curdy!
Last month I took a trip to a raw dairy farm in Pennsylvania with a few friends and found myself on a whole new adventure. I'm not much of a raw milk advocate, largely because I don't really understand the whys and hows of pasteurization. But more importantly, because I live in Maryland. The sale of raw milk is illegal here. But the opportunity to buy raw milk from a highly reputable farm couldn't be passed up. I'm not quite sure what we expected a raw dairy farm to be like. It was a small store, probably 30'x8' in size, packed with, obviously, raw milk... cow milk, goat milk... butter... and other classically sustainability-oriented products like pastured meat and local honey. Manning the store was a young boy, probably not twelve years of age. We gathered the bounty of illicit goods and filled our cooler full. Raw dairy. Ooh.

Then my friend said, "They sell kefir. I've always wanted to try that. Do you want to share some?" I'd heard of kefir, but really had no knowledge of what it really was. I thought it was Indian yogurt (wrong). What the heck, I thought, after all, I'm living out of the box here! Our hopes were dashed in seconds though, when the boy said they had no kefir available.

"We do have kefir grains, though, and you can make your own", interjected the boy's much older brother who had joined the room. Make it? Yes, he told us, it's sort of like making yogurt or soft cheese. The idea of trying kefir, this unfamiliar super food, was mildly interesting, but the idea of making kefir, now that was down right intriguing! Right down my alley. A nod, a shrug, and a few minutes later we were proud owners of a bottle of kefir grains. Now we just had to figure out what they heck that meant.
This is what the grains look like... kefir in the pot below

We came home with a small milk bottle of milk with some thingies in it and a set of instructions. Pretty straightforward: put thingies (more formally, grains) in crock, cover with milk, let sit 24 hours, strain out thingies. The liquid left is kefir. Best served as a smoothie made with frozen berries.

All well and good, then the instructions continue that the grains will grow over time. The grains need to be fed, essentially, and can be slowed down in the fridge, but they can be completely dried out and stored at room temperature for years.

So, what in the world were these grains? Not clear.  I did some research. I found kefir to be totally fascinating. Here's some cool things I learnt in the last few weeks:
  • it is really funky stuff.. it looks weird... it acts weird.. tastes a bit weird.. and is very cool... and, apparently, is a super food. 
  • kefir grains have nothing to do with plant material. The grains are globules of bacteria. Healthy bacteria that has powerful properties (probiotics) to support healthy digestive systems. 
  • These grains look like jelly globs. The globs range from pea size to walnut size. We're measuring their growth for a science project. 
  • kefir is actually a fermented dairy product with less than 1% alcohol content ....
  • you can use any kind of dairy, and now that we quickly ran out of our raw whole cows milk, we're trying pastured pasteurized whole milk from South Mountain Creamery...
  • kefir tastes like a very yeasty plain yogurt, but it's more unattractive to look at...it is definitely a liquid, with curded flakes that separate out... and I should say, our kefir because... 
  • kefir originates from the Caucuses and is passed along through the growth of grains...
  • attempts to reproduce kefir in a lab setting have failed, and it is unclear exactly what all the bacteria in the grains are.... 
  • as I understand it, the grains will also change based on the bacteria in the environment they are in, so, it seems, your kefir is somehow uniquely your own... 
  • kefir made commercially is not really kefir, but a dairy product made with major bacteria strains from kefir grains... 
  • same is true of things called kefir culture... they are a few of the extracted bacteria and can't be used to grow kefir grains over time...
  • when your kefir grows enough, you can split it and share it, but you have to keep feeding it by replacing the milk it sits in weekly... like sourdough... 
  • it takes a little bit of work, a few minutes a week, and some forethought, but is pretty easy to manage...
  • when you puree kefir with frozen blueberries and sugar it tastes just like a yogurt smoothie. 

There was a great video on fermented food by Sandor Katz, author of The Art of Fermentation,... there is a section on kefir, but the whole thing is fascinating.

http://www.youtube.com/watch?v=kmDtbvRZnw4

My son also found interesting YouTube videos on making kefir with coconut water, instead of dairy... to make fermented beverages.. called water kefir.... 

http://www.youtube.com/watch?v=d-WGJG4A1mg


Saturday, June 9, 2012

Spring Sprang and Here We Go Again

Softneck garlic - huge bulbs!
So things were pretty quiet during the winter. It was mild, and we had a very successful second year with our Winter CSA subscription at Everblossom Farm. There is something extra special about being able to get fresh, locally grown produce through the winter.

Now I am back, and google has a new look to their blogging interface. Not sure I like it, not sure I like any of the austerity measures they've put into their interfaces. Not sure I get it. But, in any case, so it is. Free is free.

We've really just started the local produce season, but it is off to an auspicious start for me. Last Fall I dragged the 8'x8' raised sandbox I made for my son when he was little out into the front yard, next to the fenced in raised bed of last season, and filled it with various soils. I can't recall whether I posted anything about that. One would definitely wonder why. I haven't had a successful season of gardening just about any food of my own in some 10+ years of trying. I mean, I can grow oregano in the yard, and mint.. neither of which, in truth, can be killed by the strongest of wills... but actual Summer veggies have failed or done poorly. So, I tried again.

This time I planted softneck garlic in the raised box. I planted them in early November, I think, or late October. I decided to try softneck because they will last longer than hardneck garlic. Indeed, based on what I've read, I don't understand why most people plant hardneck garlic. It starts sprouting or softening within a few months and even the most dedicated of garlic eaters would have trouble finishing 30-50 heads of garlic before it goes. In any case, I went with softneck. Last year I planted hardneck, and I did get garlic. I posted about that. I was thrilled. My largest bulb was the size of a large walnut! But hey, it was garlic. And, honestly, even though it was hardneck, stored in the dark basement it lasted me, without softening/sprouting issues, through to mid-winter.

A few weeks ago, some of the garlic fell over. I thought it was the storms. Not quite sure what to do. I thought you harvested garlic here in late June. Thankfully, I decided a few days later to do some googling on the subject. With softneck, when the garlic falls over, you better pull it. So, we did. And we had a few bulbs that were large walnut size, but mostly we had big fat bulbs!! big! fat ! bulbs! i'm totally excited.

And, on top of that, I also through beet seeds in that bed early spring. I have never successfully grown any actual beet, though I have gotten some greens. When I pulled the garlic, I also pulled five large beets from the ground. Woo-hoo!
my beets.. not huge, but not bad!

AND, there are peas.. which probably need to be harvested today...

in the meantime, I put some tomato plants into the raised compost bed from last year. Last year the not-done compost that I paid a fortune for killed off all of my plants. like seriously sucked them of their life blood and killed them. I am hoping that a year on the compost is more giving. We'll see. I have been growing chard in it over the spring, and that has been producing, but I think chard is pretty easy to grow.

So, I'm like a real farmer.

And, on top of that, I joined the Love Dove Farms CSA. I profiled John Dove last spring and I am thrilled to support him as he tries to convert the family farm, or a part of it, into an organic produce farm. There was a great article about him and the farm in last month's Howard magazine. Take a Look. I'll let you know how the CSA goes.

Friday, February 3, 2012

Making your own vanilla extract -- how cool is that?!

Vanilla extract to be
A friend gave me homemade vanilla extract this Christmas. I thought that was just the coolest gift. I'd never really thought about how extract was made, much less realized that you could make it as a unique simple gift. Loved, loved, loved it. So of course, I had to set out to make some for others. I did a bit of research and it turns out my friend bought her supplies from a high quality vanilla bean supplier: Beanilla.com.

Taking a look at their website, I found not only an array of different origins of vanilla beans, but also organic beans. There were certified organic beans from Mexico and beans grown organically, according to the site, but not certified from India. In addition, they had the beans that you've heard of before -- bourbon and madagascar vanilla -- as well as a handful of others. Reviewers cited their large plump beans, and I decided it was worth a shot. They also sell a variety of other vanilla products, as well as the jars you need for extract.


There are a number of very informative posts on making vanilla extract on the Internet, and I'm certainly not an expert. One of the best I read is found here.  The important thing is that vanilla can age over years, like wine, with a little bit of care. During the initial extract, you are shaking the bottle regularly. Once it's extracted enough to start using it --about 4-5 weeks -- then you just top off the vodka (or rum) each time you use it.  About 6 months in, it is recommended that you remove the beans and strain the seeds. You re-bottle the extract and let it age, or use it. A totally wonderful "reuse" product, you can then take the beans, dry them, and store them with sugar to create vanilla sugar. How's that for fully using a product??

Making the extract was pretty straight forward. We cut open the beans, used a knife to scrape out the seeds. Filled the bottles with vodka, and capped them.
That's a pairing knife but these are big SOFT beans
you can barely see the hundreds of little seeds in there

Add vodka

A few days later we used one of our remaining beans to make Jamie Olver's Proper English Custard. My first attempt at that, having made Bird's Eye custard quite a lot in my younger days. This was a lot more technically complicated, but O-M-G... unbelievably delicious. Definitely the best custard I've ever eaten... or so I recall. :)