Saturday, June 9, 2012

Spring Sprang and Here We Go Again

Softneck garlic - huge bulbs!
So things were pretty quiet during the winter. It was mild, and we had a very successful second year with our Winter CSA subscription at Everblossom Farm. There is something extra special about being able to get fresh, locally grown produce through the winter.

Now I am back, and google has a new look to their blogging interface. Not sure I like it, not sure I like any of the austerity measures they've put into their interfaces. Not sure I get it. But, in any case, so it is. Free is free.

We've really just started the local produce season, but it is off to an auspicious start for me. Last Fall I dragged the 8'x8' raised sandbox I made for my son when he was little out into the front yard, next to the fenced in raised bed of last season, and filled it with various soils. I can't recall whether I posted anything about that. One would definitely wonder why. I haven't had a successful season of gardening just about any food of my own in some 10+ years of trying. I mean, I can grow oregano in the yard, and mint.. neither of which, in truth, can be killed by the strongest of wills... but actual Summer veggies have failed or done poorly. So, I tried again.

This time I planted softneck garlic in the raised box. I planted them in early November, I think, or late October. I decided to try softneck because they will last longer than hardneck garlic. Indeed, based on what I've read, I don't understand why most people plant hardneck garlic. It starts sprouting or softening within a few months and even the most dedicated of garlic eaters would have trouble finishing 30-50 heads of garlic before it goes. In any case, I went with softneck. Last year I planted hardneck, and I did get garlic. I posted about that. I was thrilled. My largest bulb was the size of a large walnut! But hey, it was garlic. And, honestly, even though it was hardneck, stored in the dark basement it lasted me, without softening/sprouting issues, through to mid-winter.

A few weeks ago, some of the garlic fell over. I thought it was the storms. Not quite sure what to do. I thought you harvested garlic here in late June. Thankfully, I decided a few days later to do some googling on the subject. With softneck, when the garlic falls over, you better pull it. So, we did. And we had a few bulbs that were large walnut size, but mostly we had big fat bulbs!! big! fat ! bulbs! i'm totally excited.

And, on top of that, I also through beet seeds in that bed early spring. I have never successfully grown any actual beet, though I have gotten some greens. When I pulled the garlic, I also pulled five large beets from the ground. Woo-hoo!
my beets.. not huge, but not bad!

AND, there are peas.. which probably need to be harvested today...

in the meantime, I put some tomato plants into the raised compost bed from last year. Last year the not-done compost that I paid a fortune for killed off all of my plants. like seriously sucked them of their life blood and killed them. I am hoping that a year on the compost is more giving. We'll see. I have been growing chard in it over the spring, and that has been producing, but I think chard is pretty easy to grow.

So, I'm like a real farmer.

And, on top of that, I joined the Love Dove Farms CSA. I profiled John Dove last spring and I am thrilled to support him as he tries to convert the family farm, or a part of it, into an organic produce farm. There was a great article about him and the farm in last month's Howard magazine. Take a Look. I'll let you know how the CSA goes.

Friday, February 3, 2012

Making your own vanilla extract -- how cool is that?!

Vanilla extract to be
A friend gave me homemade vanilla extract this Christmas. I thought that was just the coolest gift. I'd never really thought about how extract was made, much less realized that you could make it as a unique simple gift. Loved, loved, loved it. So of course, I had to set out to make some for others. I did a bit of research and it turns out my friend bought her supplies from a high quality vanilla bean supplier: Beanilla.com.

Taking a look at their website, I found not only an array of different origins of vanilla beans, but also organic beans. There were certified organic beans from Mexico and beans grown organically, according to the site, but not certified from India. In addition, they had the beans that you've heard of before -- bourbon and madagascar vanilla -- as well as a handful of others. Reviewers cited their large plump beans, and I decided it was worth a shot. They also sell a variety of other vanilla products, as well as the jars you need for extract.


There are a number of very informative posts on making vanilla extract on the Internet, and I'm certainly not an expert. One of the best I read is found here.  The important thing is that vanilla can age over years, like wine, with a little bit of care. During the initial extract, you are shaking the bottle regularly. Once it's extracted enough to start using it --about 4-5 weeks -- then you just top off the vodka (or rum) each time you use it.  About 6 months in, it is recommended that you remove the beans and strain the seeds. You re-bottle the extract and let it age, or use it. A totally wonderful "reuse" product, you can then take the beans, dry them, and store them with sugar to create vanilla sugar. How's that for fully using a product??

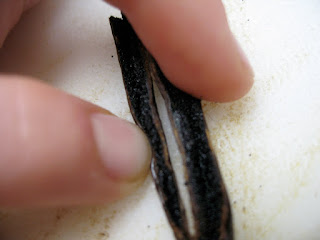
Making the extract was pretty straight forward. We cut open the beans, used a knife to scrape out the seeds. Filled the bottles with vodka, and capped them.
That's a pairing knife but these are big SOFT beans
you can barely see the hundreds of little seeds in there

Add vodka

A few days later we used one of our remaining beans to make Jamie Olver's Proper English Custard. My first attempt at that, having made Bird's Eye custard quite a lot in my younger days. This was a lot more technically complicated, but O-M-G... unbelievably delicious. Definitely the best custard I've ever eaten... or so I recall. :)

Sunday, November 27, 2011

The Real Winter Squash: Blue Hubbard

Blue Hubbard Squash in pieces
 Our first Winter CSA pick up included potatoes, radishes, collards, carrots, fennel, bok choy, leeks, cilantro, and what I had been waiting nearly a year for... a Blue Hubbard squash. I forgot to photograph it whole, so here it is on the left, split in two and another slice taken from the top. These amazingly ugly squashes are unbelievably tasty. Last year I used them for pie and equally delicious soup. In Germany in the winter we would have lots of kerbis (meaning gourd) soups and other dishes through the Fall. Kerbis oil and seeds are used as condiments. The one thing you'll never see is kerbis pie. Funny. They just don't eat the same type of desserts as we do.


Roast until soft in oven

What they are missing !


You cook Blue Hubbard like Butternut or other winter squashes. Cut them in chunks, scrape out the seeds, and roast the pieces in the oven at 350F for 45 minutes or so. They'll be totally soft and you scrape the skin off to mash the remains. 

Puree and add ingredients
 Once you have something like this, it can be pureed with spices, cream, and eggs for pie. Or changed into some other savory dish.


Did you know that most commercial pumpkin for pumpkin pie - the kind you buy in a can - is butternut squash? It's interesting to me that you'll find quite a lot of people who say they don't like squash, or particularly butternut squash, but will eat it as pie.  Of course, the sugar and cream probably influences that.


wonderful Blue Hubbard Squash pie
 But Butternut squash soup tastes nothing quite like Blue Hubbard. I'm hoping for at least one more squash this season.

Which isn't to say that Butternut isn't great for soups. I have two wonderful recipes for it. One combines the squash with ginger for a smooth soup that balances those wonderful flavors. The other keeps chunks of squash in with pork, creating a chunky Fall stew for a tasty pairing.


One Blue Hubbard is enough for two deep dish pies and several small ramekins. Looks good, eh?


Dried squash seeds
My great find this year is dried seeds. Of course, I'm constantly looking for ways to use my new dehydrator. I dried apples and raw almonds in the last few weeks. The almonds are soaked overnight and then dried for 24 hours. This keeps them a bloated, crispy feel that's hard to describe and absolutely addictive.


I figured the seeds might well work the same. I soaked them for about 6 hours, dried for about 12 hours. I sprinkled on some cinnamon at the start, too. The result were puffy seeds with a paper-like outer coating that was similar to rice paper in consistency.


The kernel is a green yummy morsel
The outer white part is fibrous and a bit chewy, but the seed on the inside has a wonderful delicate taste of pumpkin.

In Germany I would buy raw kerbis seeds for my yogurt. These were dark green seeds, and I could never quite make out really where they came from. I've never seen a green squash seed. But taste testing our new dried seeds, my son and I realized there was a separate kernel inside the white coating which was giving the fabulous flavor. Sure enough, with some effort you can pull off the white coating to reveal a green seed. It's a bit difficult, and you can see my finger nail marks on the green seed here, but hey, you get the idea. I do wonder how they strip off the outer coating commercially now. Hmm....


Tuesday, November 15, 2011

Better Life through Canning

So, this past weekend I got invited to a local canning swap and trade party. I know it sounds a bit weird or, well, domestic maybe, boring to some, old to others,.... dated maybe... but, this is the kind of gathering I've been wanting to join for some years. The idea is that you can things during the harvest season, either by yourself or in canning parties, and then bring a bunch of canned goods for others to taste. At the end of the event, all the unopened cans are laid out and folks fill their baskets with roughly what the number they brought in. There were six of us on Sunday. I took ten jars and came back with ten jars, only two of which were mine. Not bad.

The reason these types of trades are so intriguing to me is, aside from the whole aspect of socializing with others who do arcane things, the sheer variety you get without being overwhelmed. If you are canning alone in your kitchen, just you and your pot of boiling water (I'm cheap and don't own a pressure canner), even with small batch canning, you'll end up with 4-8 jars of whatever you make. Let's say eight. So if you make six half pints Apple Ginger Chutney, that's actually a lot of chutney to consume over the year. Of course, you can gift these things, and sometimes I do. But, let's be honest, the vast majority of folks have no appreciation of the amount of work that went into making that unusual chutney. Some will avoid opening it, instead waiting for the right special occasion where chutney calls out to them and they have all the right guests and all the right china on the table. Or, in all likelihood, they have no idea how one would eat chutney; isn't that some weird foreign food? So I'm leery of gifting unusual recipes even though I might just love to try a jar myself.

I'm quite generous, I think, with my canned goods and other things I make, as long as folks will appreciate them. I can see my little Golum coming out, though, when I recognize that's not the case. This year life interrupted, and I was unable to get many sour cherries. The result: two pints of sour cherry jam. Nothing else. No frozen cherries. Nothing. My sour cherry jam rocks. And I know it's totally sad and selfish, but when folks who like Smuckers just as much are digging in, I have to hold down my inside voice... "it's mine, my precious".... and I might just be guilty of sliding that one to the back of the fridge and bringing my less-than-favorites to the front. The sins of a canner.

On the other hand, my hot pepper jellies are usually a big hit, particularly with folks who haven't paired them with cream cheese. I had so many request for jars last year that I made double this year to give to whomever wants them. Pepper jelly is so unique and one of the coolest ways to make a quick Real Food appetizer, I'm delighted that folks like it and glad to share.

In any case, when you make unusual recipes, you are often, well, I am often, stuck then with jars of unusual recipes. Luckily, last year my son absolutely loved the spiced blueberry cherry preserves in his yogurt. These were Fall spices, like cinnamon and nutmeg stewed into blueberries and sour cherries. It tasted good, I though, but four quarts good? Not for me. It took the year, but we did eat them all. Still, this year I went back to tried and true things.  Which means, when I got invited to this party to share, since I wasn't quite expecting it, I wasn't quite prepared either.

I brought garlic dill pickles, apple sauce, and pepper jelly. The first two are things most everyone makes. Most everyone makes a lot of. Not too exciting to swap. I also had one jar of lemon basil jelly, which was interesting.  The great thing is that these kind of parties usually involve generous people who are willing to try other folks stuff and appreciate the work involved, so I did pretty well.

For my part, I got to take a home a jar of Blackberry Lime jam, pumpkin butter, cranberry jam, pickled watermelon rind, a different pepper jelly, apple chutney, and bay leaf infused plum jam. Plus, I got a bit of pineapple sage butter. We tasted various breads that others made, and an apple cobbler. Not too shabby. And the group was all knitters, so we sat around, talked, and did that too...Bonus!

Saturday, November 5, 2011

Crushing Grapes at Serpent Ridge Winery

 It's taken me a few more weeks than I had hoped to get these photos up from my recent volunteer day with Serpent Ridge Winery in Westminster, Md. Life intervenes.

For more than a year now, I've been watching the winery's calls for volunteers to help crush, press, pick, or bottle, hoping to match up a day when I was free and they needed help. Invariably things didn't work out. Turns out, a lot of people like to volunteer at the winery and you only need so much help at a time. But finally, in mid-November I got my chance.

My friend, Maureen, and I joined six other volunteers for a morning of crushing cabernet sauvignon grapes that the winery had just received from another farm in Maryland.  After a morning of lifting, pouring, and cleaning, we were rewarded with a wonderful lunch and a discount on our wine purchase. It's a great experience to be involved in, and hopefully we'll get the chance to do other parts of the process next year.

Maureen weighs a box of grapes - they ranged from 14-30+ lbs

This is what the grapes look like before crushing...
The crusher before it's in place...


And after crushing....


Create a work line to pass along the grapes
They try to quickly pull junk out of the grapes before they get crushed
And, the bins get cleaned after their grapes are dumped...
This is the winery cat, Zork, named after the wine cap